

Cycles ist eine der Renderengines von Blender und meine momentan bevorzugte Option.
Dieser Beitrag soll erklären wie man bei einem fertigen Modell simple Renderbilder mit Cycles erstellen kann.
Es werden also einige Dinge an das Modell vorausgesetzt:
- UV Map vorhanden
- Color Map vorhanden
- Normal Map vorhanden
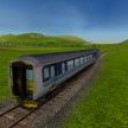
Als Beispiel dient mir die BR 89 von UrbanGames die ich nach Blender importiert habe.
Folgendermaßen lässt sich nach dem Importieren vorgehen:
- Umstellen von Blender auf Cycles ; Anlegen des Fensters für Nodes ; Öffnen des Material Reiters
- Use Nodes im Material setzen
- Einrichten eines einfachen Cycles Material -> Ich nutze hier zwei Shader einmal Diffuse und einmal Glossy, sowie die beiden Texturen. Der Alphakanal der Normalmap Steurt den mixshader und damit die Position des Glanzes auf der Textur, da es keine weiteren Objekte im Bild gibt lasse ich die Informationen Über Reflektionen im Alphakanal der Colormap außer Acht. Der RGB Kanal der Normalmap ist etwas unprofessionel in den Displacementeingangs des Material gesteckt, aber das reicht für diesen einfachen Fall
- Zuletzt stelle ich dann noch die Render und die Previewsettings ein, hier ist besonders wichtig die GPU rendern zulassen, da sich sonst sehr lange Render Cyclen ergeben.
Dieser Beitrag deckt nur grundsätzliches ab, Cycles kann wesentlich mehr und auch Materialien können wesentlich komplexer sein. Dazu folgt später ein weiterführender Eintrag
English:
Cycles is one of Blender Render engines. It provides a large variety of features and this article covers only a few basic ones.
However you should be able to create your own rendered images using finished train fever models as a ressource.
Therefore you need to have a modell imported into Blender.
The first step is to activate Cycles.
You can do this by selecting Cycles in the marked area.
If your computer is equiped with a powerfull graphic card you should activate it in the user preferences, as it improves your render times.
The second step is to enable the use of nodes.
Nodes are little fields which are used as a part of the userinterface to give you an easy way to create a material and to control its settings.
To activate this feature you must select a material for your model and then select use nodes.
If you switch to the node editor via the controlfield in the bottom left corner you should now see a very basic node setup, which should be consisting of ah diffuse shader and a material output node.
The next step is to refine this setup to a better one, while keeping it still quite simple.
The material should recreate all features that it has in Train fever. Therefore another shader node is needed, the glossy shader, which creates material that is able to reflect light rays. New nodes can be added using "shift + a" or the menu on the lefthand side.
To get the colormap and the normal map of your model into your scene two image nodes are needed, you can load an external image from these nodes. Then you connect both nodes in the way shown in the picture. The alpha chanel of the normal map and the outputs of both shaders are plugged into a mix shader. This way your alpha channel controls to what percentage, which shader will be shown in the render, aswell as the postion of this.
The last step is to set your render settings to your taste. This is where you control quality and render times. It's important to activate GPU rendering if you have a fast graphic gard as this is going tzo save you time. Furthemore you should activate the auto tile size plugin as this tweaks rendering times as well. The main way to controll quality and time beside the choosen reslution are the choosen samples. Alot of samples mean high quality, but slow rendering and vice versa.
example render of urban games B 89.
transportfever.net/wsc/attachment/35675/